Tutorials
How to Make a VTuber Model: 2D, 3D, and Image-to-VRM Workflows
Learn how to make a VTuber model by comparing Live2D, manual 3D, commissioned, and Virmii image-to-VRM workflows, then test tracking and connect the avatar to OBS.
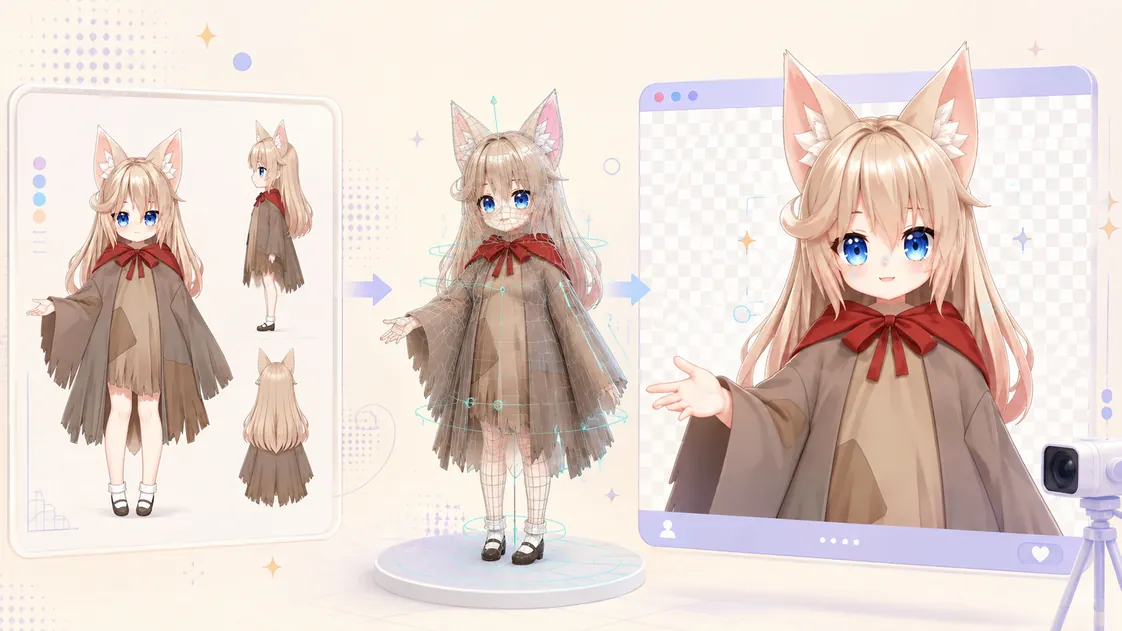
How to make a VTuber model: choose the workflow first
Making a VTuber model can mean drawing and rigging a 2D puppet, building a three-dimensional avatar by hand, commissioning a specialist, or generating a 3D starting point from character artwork. The right route depends on the look you want, the time and budget available, and how much control you need over the finished model.
Virmii is built around the 3D VRM workflow. It can generate a 3D avatar from one reference image, keep generated and uploaded VRM models in a private library, drive supported movement with browser-based camera tracking, and render the avatar in OBS through a private Browser Source. It does not create or import Live2D models.
Before starting, decide four things:
- whether the final character should look hand-drawn in 2D or exist as a 3D model;
- whether you need a fast prototype or a carefully art-directed final asset;
- whether you will build the model yourself, commission it, or use generation as a starting point;
- which tracking and streaming applications must support the final file.
2D Live2D or 3D VRM?
A 2D model starts as a layered illustration. The artist separates the eyes, mouth, hair, face, clothing, and other moving parts, then a rigger deforms those layers in Live2D Cubism. The result keeps the original drawn style, but its possible angles and movements depend on what the artist and rigger prepared.
A 3D avatar is made from meshes, textures, materials, a humanoid skeleton, and optional facial expressions and spring-bone physics. A compatible VRM model can be viewed from different angles and moved in three-dimensional space. The VRM format adds avatar-specific conventions to glTF so supported applications can understand its humanoid bones, metadata, and expression bindings.
| Area | 2D Live2D model | 3D VRM model |
|---|---|---|
| Starting asset | Layered character artwork | 3D mesh or a reference image used to create one |
| Rigging | Deformers and parameters in Cubism | Humanoid bones, skin weights, and expression bindings |
| Visual range | Designed 2D angles and poses | A model that exists in full 3D space |
| Typical output | Live2D project and runtime files | .vrm avatar file |
| Virmii support | Not supported | Generated VRM and compatible custom VRM uploads |
Choose Live2D when preserving a specific illustration style is the priority and you are ready for a specialized art-and-rigging process. Choose VRM when you want a portable 3D avatar, broader camera movement, or Virmii's generation, browser tracking, and OBS workflow.
Three ways to get a VTuber model
There is no single best production method. These three routes solve different problems:
| Workflow | Skills or input | Creative control | Typical pace | Best use |
|---|---|---|---|---|
| Build it yourself | Blender, VRoid Studio, Live2D, texturing, and rigging skills | Highest, because you control the source files | Usually the slowest | Learning, unusual designs, or precise technical requirements |
| Commission an artist or rigger | A clear brief, references, budget, and feedback | High within the agreed scope and revision terms | Depends on the creator's schedule | A polished identity for a long-term channel |
| Generate a 3D draft with Virmii | One clear, authorized character image | The source image guides the result, but unseen geometry is inferred | Faster path to a testable 3D model | Prototypes, first streams, and concepts to refine later |
A commission can range from a simple premade avatar to a custom art-and-rigging package. Our VTuber model commission cost guide explains what changes the price and what to confirm before paying a deposit.
Generated models have a different trade-off. Virmii can reduce the manual work needed to reach a rigged VRM, but it does not promise hand-authored topology or an exact reconstruction of details that are hidden in the reference. Inspect the actual result before treating it as a final production asset.
Step 1: design the character and prepare the right reference
For a manual build or commission, front, side, and back views can help the modeler understand proportions, clothing layers, and details that would otherwise be hidden. Expression callouts and close-ups are useful when a specific facial performance is part of the brief.
Virmii supports both image-based and text-only avatar generation. Choose From text to describe a character without a reference image, or From image to upload one character image. Image mode does not accept a collection of turnaround views. For the clearest image input:
- use a mostly forward-facing full-body or half-body character;
- keep the head, hair, clothing, hands, and feet visible where possible;
- leave some space around the silhouette;
- avoid extreme poses, crossed limbs, overlapping props, text, and watermarks;
- use artwork you own or are authorized to process.
Virmii accepts PNG, JPEG, and WebP images. The file must be 10 MB or smaller, at least 256 × 256 pixels, and no more than 40 megapixels. A long side around 1024–2048 pixels is a practical target when the original artwork supports it.
If you are drawing or commissioning the source art, use our guide to make a VTuber reference sheet. For Virmii generation, export one clean primary view from that sheet rather than uploading several character views inside one crowded image.
Step 2A: build a Live2D model
The Live2D route begins with a high-resolution illustration whose moving parts are separated into well-named layers. A rigger imports the PSD into Cubism, creates meshes and deformers, and connects parameters for head angles, eye movement, blinking, mouth movement, hair, clothing, and expressions.
Test the completed model in a Live2D-compatible tracking application, then capture that application's transparent output in OBS. This is a separate ecosystem from Virmii: a Live2D .moc3 model cannot be uploaded as a Virmii avatar, and Virmii does not convert it to VRM.
Step 2B: build and export a manual 3D VRM
VRoid Studio is an approachable option for anime-style avatars assembled from customizable bases. Blender gives experienced artists more control over custom geometry, UVs, textures, materials, weights, and shape keys.
Whichever tool you choose, a trackable model needs a readable humanoid armature and sensible skin weights. Facial tracking also depends on expression or morph-target bindings. Configure VRM metadata and usage permissions before exporting with a maintained VRM exporter.
Do not rename .glb to .vrm. VRM uses the glTF container, but it also requires avatar-specific extensions and mappings. Virmii does not currently convert generic GLB uploads to VRM; complete that work in Blender or Unity first. See our GLB-to-VRM preparation guide for the full process.
Step 2C: create a VRM from one image with Virmii
Open Virmii's avatar creation screen, enter an optional avatar name, and choose the prepared image. The page checks the file type, size, and image dimensions and shows the current credit cost before submission. Generation begins after the upload passes validation.
The job then moves asynchronously through several stages:
| Stage | What happens |
|---|---|
| Reference upload | Virmii validates and stores the submitted image for processing. |
| Base model generation | Tripo creates a textured 3D model from the visible reference. |
| Automatic rigging | The generated model receives a humanoid rig. |
| Virmii preparation | Virmii checks the humanoid mapping, processes available facial data, prepares metadata, and builds the VRM. |
| Final delivery | The completed model and available downloads are attached to the job. |
Third-party service notice: Tripo is an independent third-party provider used for base model generation. References to Tripo do not imply partnership, endorsement, or sponsorship between Tripo and Virmii.
When the job finishes, rotate and inspect the avatar. Look for merged accessories, uneven texture placement, unusual hands or feet, and differences on the back or side. A single image does not show every surface, so the system must infer the missing information. Generation quality and available tracking features vary by character and source image.
Generated avatars may expose the completed VRM and the source GLB as time-limited downloads when those files are available. Keep your own copy before the link expires if you plan to edit or archive the model.
Step 3: prepare bones and facial expressions
A valid humanoid rig identifies the main body bones so an avatar runtime knows how to move the hips, spine, head, arms, and legs. Skin weights determine how the mesh follows those bones. Poor weights may cause stretching, collapsed joints, or clothing that cuts through the body.
Facial motion is separate from the body rig. VRM expression bindings can connect named controls to blink, gaze, mouth shapes, and emotions. Virmii uses supported head movement, gaze, blink, mouth, and expression controls when the model provides compatible data; it does not drive every possible ARKit blendshape.
If you are preparing a custom VRM for upload, prioritize stable blink and mouth bindings before adding a large expression library. Author or repair those bindings in a VRM-compatible editor and test the exported file.
Virmii supports AI expression generation for models created in Virmii. Open the completed model and select Generate expressions to create 13 images for blinking, smiling, and mouth movement. The artwork follows camera tracking in Virmii previews, Live Studio, and OBS without requiring facial shape keys. Uploaded VRMs use their existing bindings. See the AI expression generation guide.
AI expression generation costs 20 credits per set without a subscription. Creator and Pro use included monthly generations first; additional sets cost 20 credits. The initial charge is kept if generation fails. Each model version allows up to 2 free retries for missing or failed images, without using more credits, included generations, or model retry attempts. See pricing for the current monthly allowances.
Step 4: validate what the VRM actually supports
For a custom model, Virmii accepts one .vrm file up to 30 MB. It checks that the file is a glTF container with a VRM 0.x or VRM 1.0 extension before adding it to the model library. This is an import compatibility check, not a general-purpose repair tool or a guarantee that every expression and spring bone behaves perfectly.
Before going live, confirm that:
- the avatar loads without missing meshes or textures;
- the humanoid pose looks correct at rest;
- head rotation does not collapse the neck or shoulders;
- blinking does not move unrelated parts of the face;
- mouth movement is visible and does not tear the mesh;
- hair, ribbons, and clothing physics remain stable;
- the model's usage terms allow your intended stream and monetization.
Run the exporter or authoring tool's own validator before upload, then use Virmii's preview and tracking test to evaluate the behavior that viewers will actually see.
Step 5: test camera tracking in the browser
Open the model's Tracking Studio in a current desktop version of Chrome or Edge. Grant camera access, sit in a neutral forward-facing pose, and use soft front lighting. Virmii processes raw camera frames locally in the browser by default and derives motion parameters with MediaPipe. The raw camera video is not sent to the Virmii backend.
Test movement in a predictable order:
- Nod, turn, and tilt your head slowly.
- Move slightly closer to and farther from the camera.
- Blink each eye naturally.
- Look left and right without turning your whole head.
- Form clear mouth shapes and check whether the model responds.
Virmii's current tracking flow is camera-based and requests no microphone audio. Mouth movement comes from visual face tracking, so speaking clearly toward the camera and keeping the mouth visible matters more than microphone settings. For a Virmii-generated avatar, use Generate expressions on its model page to add facial artwork before calibrating. Uploaded VRMs need compatible expression bindings in the file.
Step 6: add the private Virmii stage to OBS
Once tracking works in the browser, create a private OBS URL from the Tracking Studio. In OBS, add a Browser Source, paste that URL, and set the source size to match your canvas, such as 1920 × 1080.
The Virmii live stage already has a transparent background, so it can sit above gameplay, artwork, or a scene without a green screen or chroma-key filter. Keep the Tracking Studio open while streaming. It sends compact movement data to the private stage over WebRTC; OBS renders the avatar and does not receive the raw webcam feed.
Treat the stage URL like a private credential. Anyone with the active link may be able to open the stage, so reset or disable it if it is exposed. Follow the complete Virmii OBS tutorial and review the VTuber setup checklist before your first broadcast.
Troubleshooting common VTuber model problems
The reference image is rejected
Check that the file is a real PNG, JPEG, or WebP image rather than a renamed file. Confirm that it is no larger than 10 MB, is at least 256 × 256 pixels, and stays within 40 megapixels.
The generated avatar does not match the back or side of the design
Those surfaces were not visible in the source image, so they had to be inferred. Try a clearer forward-facing image with a readable silhouette. If exact construction matters, use a manual or commissioned 3D workflow.
The avatar only moves its head
Virmii supports AI expression generation for models created in Virmii. Open the completed model and select Generate expressions to create 13 images for blinking, smiling, and mouth movement, then test them with camera tracking. This artwork works in Virmii previews, Live Studio, and the OBS stage without requiring facial shape keys. Uploaded VRMs use their existing expression bindings; downloaded VRMs do not include the generated artwork. See the AI expression generation guide.
Blinking or mouth movement is missing on a custom VRM
Inspect the VRM expression bindings in the source tool. The mesh may contain morph targets without mapping them to the expected VRM expressions, or the mapped shapes may not create visible deformation.
The model clips or stretches during movement
Review transform scale, bone orientation, skin weights, and hidden geometry in Blender or Unity. Clothing and long hair may need adjusted weights, spring-bone colliders, or manual mesh cleanup.
The OBS avatar stops moving
Keep the Tracking Studio open, confirm that camera tracking is active, and check the OBS connection state. If the Browser Source URL was reset or expired, create a new private link and replace the old one in OBS.
Which VTuber model workflow should you choose?
Choose Live2D when a hand-drawn look and carefully authored 2D performance matter most. Choose VRoid or a manual Blender workflow when you want direct control over a reusable 3D asset. Commission a specialist when the model is central to your brand and you can invest in a defined art, rigging, and revision process.
Choose Virmii when you want to turn one authorized character image into a testable 3D VRM without beginning with manual mesh construction. It is especially useful for a first VTuber experiment, a prototype, or a creator who wants generation, model management, browser tracking, and OBS output in one workflow. Treat the generated result as something to inspect and test—not as a guaranteed replacement for an artist or technical rigger.
Frequently asked questions
Do I need drawing or 3D modeling skills to make a VTuber model?
Not for every route. Character builders and Virmii can reduce the amount of manual modeling required. Original artwork, custom topology, precise deformation, and advanced facial performance still benefit from specialist skills.
Can Virmii make a Live2D model?
No. Virmii generates and manages 3D VRM avatars. Live2D uses a separate layered-art and rigging workflow.
Does Virmii turn any GLB into VRM?
No. Convert and configure a generic GLB in Blender with a VRM add-on or in Unity with UniVRM, then upload the completed .vrm file to Virmii.
Can Virmii generate blinking and mouth expressions?
Virmii supports AI-generated blink, smile, and mouth artwork for its generated models. Select Generate expressions on the model page, then preview the result. Image quality and alignment vary with the character, so check the expressions before streaming.
Does Virmii listen to my microphone for lip sync?
No. The current tracking flow uses camera-based facial analysis and requests no microphone audio. Mouth response uses visible facial movement to drive generated expression artwork or, for uploaded VRMs, compatible expression bindings.
Can I use a Virmii avatar in OBS?
Yes. Create a private live-stage URL in the Tracking Studio and add it as an OBS Browser Source. The stage has a transparent background and receives motion data rather than raw camera video.