Tutorials
How to Make a VTuber Reference Sheet for a Better 3D Model
Learn how to create a clear VTuber reference sheet for 3D modeling, with turnaround views, color notes, expression guides, and a Virmii-ready single-image export.
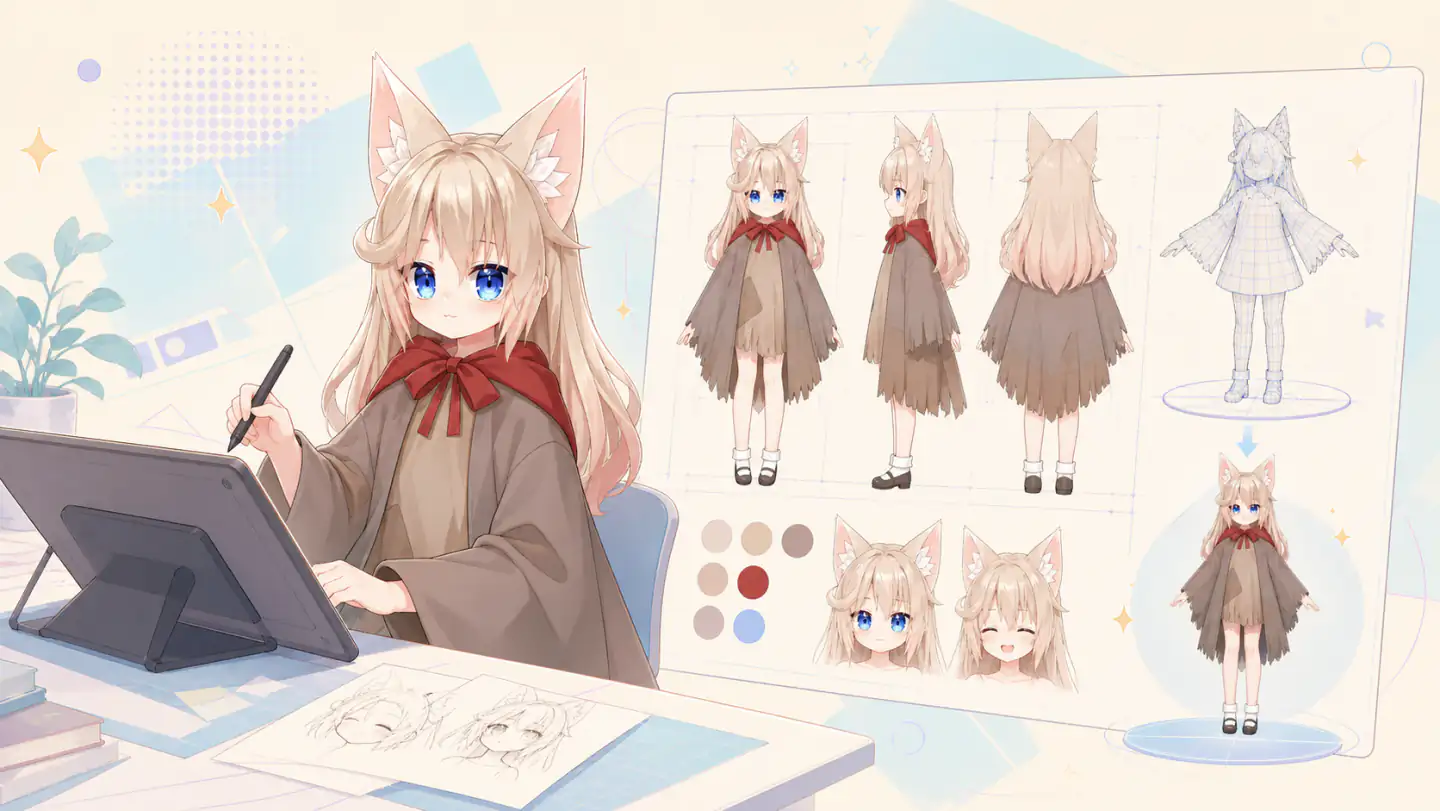
What a VTuber reference sheet actually does
A VTuber reference sheet is the handoff between a character idea and the person or tool that will build the avatar. It records the details that are easy to lose when a single illustration becomes a 3D model: body proportions, hair layers, outfit construction, colors, materials, accessories, and expressions.
The right sheet depends on the next step. A 3D artist benefits from aligned front, side, and back views. An expression rigger needs close-ups of the eyes and mouth. An image-to-3D service usually needs one clean character image rather than a dense page of annotations.
That distinction matters. More information is useful only when the recipient can read it. This guide covers both a production reference sheet for a human artist and a simplified export for Virmii's single-image workflow.
If you are still planning the rest of your setup, start with our beginner's guide to becoming a VTuber.
Reference sheet, turnaround, and expression sheet
These documents overlap, but they solve different problems.
| Document | Typical contents | Best used for |
|---|---|---|
| Character illustration | One front or three-quarter view | Establishing mood, personality, and the broad design |
| Turnaround sheet | Aligned front, side, and back views | Showing proportions and forms that are hidden from one angle |
| Expression sheet | Face close-ups with eye, brow, and mouth variations | Planning blendshapes, expression presets, and facial rigging |
| Production reference sheet | Turnaround views, detail callouts, colors, materials, and expressions | Giving an artist or modeler one consistent source of truth |
A polished illustration can communicate personality better than a neutral turnaround, but it often hides the back of the hair, the shape of a shoe, or the way one garment sits under another. A good production sheet removes those questions without turning the page into a wall of tiny drawings.
Start with one clear full-body view
Build the sheet around a full-body drawing in a relaxed neutral pose. An A-pose is common for 3D work because it keeps the arms away from the torso without placing the shoulders as high as a T-pose. Your modeler may prefer a different pose, so ask before finalizing a commissioned sheet.
Keep the main view easy to read:
- Show the whole silhouette, including the top of the hair, hands, and footwear.
- Avoid extreme perspective and dramatic foreshortening.
- Separate the arms from the torso when the outfit shape allows it.
- Use even lighting and keep cast shadows light.
- Choose a plain background that contrasts with the character.
Neutral does not mean generic. Keep the design's defining features, such as asymmetric sleeves, a distinctive tail, or an unusual eye shape. The goal is to make those features legible.
Add aligned turnaround views when a modeler needs them
For a traditional 3D commission, front, side, and back views are the most useful set. They are not universally mandatory, but each additional angle reduces the amount the modeler has to invent.
Place the views on the same baseline and add horizontal guides at the crown, eyes, chin, shoulders, hips, knees, and ankles. Check that recurring elements stay consistent. A belt should not change height between views, and a jacket stripe should not gain or lose sections around the back.
Use orthographic-looking drawings with as little perspective distortion as practical. They are visual guidance rather than engineering measurements, so do not promise mathematical precision unless the artwork was built from an actual measured model.
If a full three-view turnaround is outside your budget, prioritize the front and back, then add a side view of the head, hair, and shoes. Ask the modeler which missing angle would save them the most time.
Break down hair, clothing, and accessories
Overlapping shapes cause many of the avoidable questions in 3D production. Use small callout drawings for anything the main views cannot explain.
For hair, separate the bangs, side locks, back mass, ponytails, and loose strands. Mark where a tied section begins and which parts should move. These notes help a modeler decide how to divide geometry and physics bones, but they do not replace rigging decisions.
For layered clothing, show what sits under a coat, cape, or oversized sleeve. Include the back of patterned fabric and explain whether a small detail is embroidered, printed, metallic, or a separate object.
Accessories deserve their own views when they affect the silhouette or need to move:
- Draw shoes from the front and side, with the sole if its shape matters.
- Show buckles, clasps, hair ornaments, and jewelry at a readable scale.
- Give handheld props a clear grip point and an approximate size relative to the hand.
- Mark parts that should be removable or toggled.
You do not need a close-up of every button. Spend space on details that change the mesh, materials, rig, or movement.
Record colors and materials without baked-in lighting
Add a compact palette for the base colors of the skin, hair, eyes, and main clothing pieces. Hex values are useful for human handoff and future brand assets, but they are not a guarantee that every renderer will display the same color. Lighting, tone mapping, shaders, and monitor calibration all affect the result.
Keep color swatches free of highlights and shadows. If the hair has a gradient, show its direction separately. Material notes can be simple and concrete:
- matte cotton with little shine;
- polished metal for the buckle;
- translucent fabric on the outer sleeve;
- emissive blue detail that should glow.
Avoid prescribing shader numbers unless you and the modeler share the same rendering pipeline. Words plus a visual example are usually more portable.
Plan expressions for the rig you intend to use
An expression sheet helps the rigger understand how the character's face is meant to move. Start with neutral, blink, smile, open mouth, anger, sadness, and surprise. For speaking, show the mouth shapes requested by your rigger rather than assuming one universal viseme set.
Keep the face shape and feature placement consistent across each drawing. Expression references guide the creation of blendshapes; they do not automatically create those blendshapes or guarantee that a generated model can support them.
Virmii supports AI expression generation for models created in Virmii. Open the completed model and select Generate expressions to create 13 images for blinking, smiling, and mouth movement, then test them with camera tracking. This artwork works in Virmii previews, Live Studio, and the OBS stage without requiring facial shape keys. Uploaded VRMs use their existing expression bindings; downloaded VRMs do not include the generated artwork. See the AI expression generation guide.
AI expression generation costs 20 credits per set without a subscription. Creator and Pro use included monthly generations first; additional sets cost 20 credits. The initial charge is kept if generation fails. Each model version allows up to 2 free retries for missing or failed images, without using more credits, included generations, or model retry attempts. See pricing for the current monthly allowances.
What to do when you only have one character image
A turnaround is helpful, but it should not stop you from testing an idea. One good image can be enough for an initial AI-generated model or a first conversation with an artist.
Choose an uncropped front or three-quarter view with a readable silhouette. Avoid hidden hands, crossed legs, props covering the torso, heavy bloom, and backgrounds that merge with the outfit. A full-body image gives the system more information about proportions and footwear; a clear half-body or portrait can still be used when that is all you have.
Be realistic about the back and sides. A single image does not contain those surfaces, so an image-to-3D system has to infer them. The result may differ from what you imagined, especially for layered hair, capes, tails, and asymmetric clothing.
Written notes are valuable when briefing a human artist. In Virmii, choose From text to describe your character without uploading a reference image, or From image to use one character image and an optional avatar name. Image mode does not take a separate written brief alongside the image.
Prepare a Virmii-ready image
A complete production sheet can be busy. Before uploading to Virmii, export the cleanest character view as its own image instead of sending a page filled with turnarounds, labels, arrows, and swatches. The generation pipeline has one visual input, so the character should be the obvious subject.
The current upload requirements are:
- PNG, JPG, or WebP;
- at least 256 pixels on each side;
- no larger than 10 MB;
- no more than 40 megapixels.
Use artwork you own or have permission to process. Keep the character centered, avoid unnecessary text, and check that important features are not cropped. Then open Virmii's avatar creation workflow to generate the initial 3D model.
Virmii sends the image to Tripo for 3D generation and automatic humanoid rigging. The rest of the pipeline standardizes the model, evaluates facial capability, adds avatar metadata, and builds the VRM. You can preview the result in the browser, download the completed VRM, download the source GLB when it is available, and create a private live-stage URL for OBS.
Generation is an interpretation, not a faithful reconstruction guarantee. Complex accessories, transparent layers, and unseen geometry may need another attempt or manual work. Our one-image Virmii and OBS tutorial shows the complete route and the rough edges you should expect.
Common reference-sheet mistakes
The most common problem is inconsistency, not a lack of detail. Check for these issues before handing off the sheet:
- Colors, stripe counts, or accessory positions change between views.
- Hair or clothing layers overlap without showing what is underneath.
- The side view uses different proportions from the front view.
- Dramatic lighting hides the base colors and material boundaries.
- Tiny callouts are packed together and become unreadable at normal zoom.
- Decorative labels take more space than the character.
- Every small trinket is marked as moving, without considering clipping or performance.
For an AI upload, also avoid sending the entire busy sheet when a clean standalone character view is available. For a human commission, do the opposite: include the supporting views and notes the artist asked for.
A copyable reference-sheet checklist
Use this as a starting point, then remove anything your project does not need.
- One clear full-body primary view
- Front, side, and back views aligned to the same height
- Head and hair construction close-ups
- Hidden clothing layers and the back of the outfit
- Shoes, important accessories, and handheld props
- Flat color swatches with optional Hex values
- Short material notes for unusual surfaces
- Neutral and requested facial expressions
- Movement, physics, and removable-part notes
- Character name, version date, artist credit, and usage notes
- A separate clean image exported for single-image generation
Frequently asked questions
Do I need professional drawing skills?
No. Rough but consistent drawings, color swatches, photo references, and clear notes can be enough for a modeler to understand the design. Ask the artist what they need before spending time polishing every panel.
Which turnaround views are required?
There is no universal mandatory set. Front, side, and back views are the usual production set for a custom 3D model. A simpler model or an early estimate may need less, while asymmetric designs may need extra three-quarter views and callouts.
Should I include Hex color values?
Include them when you want a repeatable palette for artists and brand assets. They clarify the intended base colors, but they do not override lighting and shader differences. Virmii does not currently accept palette values as a separate generation input.
Can Virmii create a 3D VTuber avatar from one image?
Yes. Virmii accepts one PNG, JPG, or WebP character image and turns the generated result into a downloadable VRM workflow. The system must infer any hidden geometry, and facial tracking capability varies by model, so treat the first result as a generated interpretation rather than an exact reconstruction.